

Homesteading | Off Grid
Prepper’s & Homesteader’s Guide To Generators


For most people, buying a generator to power their household is probably the last thing on their mind. But what happens when there’s a major storm, earthquake or a SHTF disaster/scenario that knocks out the power? Even in the best of conditions, the average household will lose power on 3 occasions per year and these outages might last hours or even days depending on the cause.
Considering this, generators are an essential piece of equipment to consider purchasing. They allow you to cook your food, keep your fridge running and charge/power your electronic devices – something that’s becoming more important given how connected we all are, and especially in the current climate when many of us have converted to homeworking.
If you are considering buying a home generator, read on, as there’s a load of relevant information and advice to help you make your choice.
Household Priorities
There are lots of different types of generator and the one you’ll need will be determined by how many appliances you need to power in the event of an emergency.
You’ll need to aim to cover the basics so your home can function relatively normally during a power outage.
- Refrigerator: 600 watts
- Air conditioning: 1000 watts
- Lighting: 600 watts – depending on the time of year
- Computers/phone chargers: 300 watts
- Washing machines – 1000 watts
- Security system – 400 watts
- Hairdryer – 1200-1400 watts
- Oven – up to 5000 watts
- Toaster – 1100 watts
- Water heater – 3500 watts
Based on these essential items, you’ll probably need to look at a minimum wattage of 5000 watts.
To help you decide your own specific needs, Amazon has a nice chart detailing the running wattage and surge (startup) wattage for a range of common household appliances – you can download here – household appliance wattage chart.
Selecting the Right Generator for Your Needs
There are 4 main types of generator fit for home use.
Home Standby Generators
— Pros
- User-friendly – They’ll let you know if they need a service or encounter an error and you can even set this up via email or SMS.
- It can be fuelled by propane, gasoline, or even natural gases, which make it easier to fill and provide unlimited energy.
- Covers a wide range of wattage, so you’ll find one suitable for any household.
— Cons
- The most expensive of the 4 types. Depending on the amount of power you need, they can cost between $2000 and $6000.
- The most difficult to install. You’ll need a professional to work out the best positioning for your home. Factor in extra labor costs for this too.
- Can’t be moved in the event of harsh weather or flooding so aren’t suitable for all homes.
Recommended for: Frequent power outages.
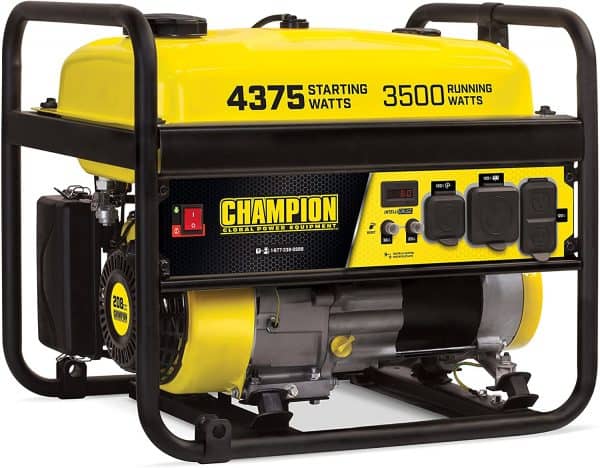
Portable Generators
— Pros
- Relatively cheap. You can pick one up for anything from $600-$2500.
- Obviously, they’re portable. They’re the easiest generator to move around if you plan on taking a trip.
— Cons
- Not flexible with fuel type and generally require gasoline. This can be difficult to get hold of, especially as the very reason that you’re using a generator might mean you can’t leave your home. Gasoline is also dangerous to store for long periods of time.
- Most likely to give off carbon monoxide, so it’s recommended to run them from an area at least 20 meters away from your home and never leave it in an enclosed space.
- You’ll need to ensure it’s always covered as they don’t do well with rain.
Recommended for: Frequent power outages, Occasional power outages, Travel.
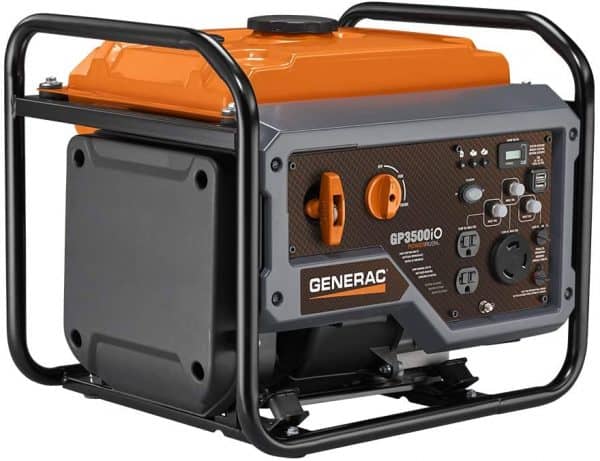
Inverter Generators
— Pros
- The quietest generators and are incredibly sophisticated when it comes to fuel economy. They’ll scale down the fuel used when you’re not using as much power and consequently, they’re much quieter – the sound grows as you turn on more appliances.
- Range from 1500 -6000 watts – one of the most powerful household generators out there.
- Come in different sizes depending on your needs, so can be light and easy to transport if you don’t need masses of power.
— Cons
- Similar in power to portable generators but are technically more complex. This means they cost a little more – up to $4000.
Recommended for: Frequent power outages – Large inverter, Occasional power outages – Midsized inverter (a slightly smaller and cheaper model).
Portable Power Stations (Also known as solar generators)
— Pros
- The quietest generators as there’s no engine to make noise.
- Don’t use fuels so they can be kept indoors. There’s no risk of carbon monoxide leakage.
— Cons
- Have a battery that needs to be charged, so you’ll save money on fuel, but unfortunately, you’ll need to remember to keep it charged. Usually, the reason that you’ll need the generator is that your electricity is out – it’s no good needing to charge it at the time.
- You can switch the generator to charge on solar power, but this relies on you living in a warmer climate, so consider the weather before you decide on this.
- Costs around $4500-$6000 – purely because they’re the newest to the market.
- They don’t have a large amount of power in comparison to the other generators, usually around 1200-1500 watts at their maximum.
Recommended for: Travel, Infrequent outages.
Are Household Generators Dangerous?
People often avoid purchasing a household generator because they’ve heard horror stories about the dangers of carbon monoxide poisoning.
The truth is generators can only cause carbon monoxide issues if you don’t purchase one that’s suitable for your home or if you don’t provide the proper care to keep it in perfect working order.
These days, generators usually have a sensor to let you know that there’s a carbon monoxide issue and may have a Lo-CO engine which is another great feature to protect against carbon monoxide overload.
There are also some standard guidelines that you should follow to ensure that your generator is used safely, whichever model you choose:
- Keep the generator around 20 meters away from your home in case of a leak
- Don’t store in an enclosed space
- Keep away from air conditioning units, windows, and doors
- Get it serviced yearly
- Transfer Switches
A transfer switch is a necessary safety feature that you should invest in. It’ll connect your generator to your circuit breaker via a single cable, making the energy transfer much more linear. You’ll just control the power to your home using a single switch. It’s recommended that you have a professional electrician install this for you as it can be a difficult process.
The Red Cross has a useful article about safe generator use at home – check it out here. Here’s an additional generator safety article from energy.gov.
Features to Consider
It might be a bit overwhelming to browse through all the special features of each generator, especially if you’re new to this. Let’s look at the common features and why you might need them.
- Auto Shut-off – automatically turns off the generator if it detects harmful levels of carbon monoxide
- Auto Turn-on – If you’re into automation, some generators will automatically switch to back up power as soon as your mains power goes off, meaning you’re never left without electricity
- Removable Console – Allows you to connect devices remotely without having to trip over extension cables
- Separate outlets – Spreads the power evenly. This is great for camping or travel
- Fuel Gauge – Tells you how much fuel is left in the generator so you know when to fill up
- Electric Start vs Pull Start
Pull start generators generally have more power and always use gasoline or propane.
Electric start generators are great for convenience and much less work as they just have a button to push to turn on the power. However, these generally have a much lower wattage to pull-starts, so think about what you intend to use it for.
Summary
Hopefully, that’s given you some insider info on household generators and their uses. Make sure you always do your research before making a purchase to ensure you’re getting the right wattage for your needs and always get it serviced. Safety first!
Source link: https://knowledgeweighsnothing.com/guide-to-home-generators/ by Drake at knowledgeweighsnothing.com
Gear
Knowing How To Properly Melt Snow During A Winter Emergency Can Save Your Life

Winter survival is no joke. You’re fighting against all the same elements of man and nature you would be during the spring, summer, and fall… except now it’s 20 degrees out at high noon and there’s snow falling a foot at a time making everything even more difficult.
Of course, one of the most basic challenges of any survival effort is making sure you have enough water. You can go a lot longer without food than you can without water. Fortunately, the winter months can provide a long-lasting, ready-made source of water in the form of snow. The problem is that melting and drinking snow isn’t as simple as… well, melting and drinking snow.

The Challenges Of Drinking Snow

Snow is frozen, water, sure. Still, there are problems that come with drinking melted snow. None of these are insurmountable challenges, but they do come with life-or-death consequences if you misjudge things. So here’s what you need to be thinking about if you’re thinking about drinking some snow:
- Purity: All jokes about “not eating the yellow snow” aside, snow can contain a number of impurities from the atmosphere it falls through as well as the surface it lands on. All of this can make it unsafe for you and your family to drink.
- Yield: Snow isn’t going to be as hydrating as you might think. All told, there’s not a ton of water inside of snow. So you need to be mindful of the fact that you’re probably not getting as much hydration as you might like.
- Body Temperature: Drinking snow when it’s too cold (or worse, simply eating it) can have serious consequences on your body’s core temperature that can quickly turn deadly.
- Energy Requirements: You’re going to need a heat source to melt snow and that requires energy… something that can be in short supply in any survival scenario.

The Risk of Contaminants

Contaminants are a serious risk when it comes to snow. There are airborne pollutants to worry about, but also microorganisms that can live in the snow and make you sick. It’s important to address both of these concerns when purifying your snow water.
Chemical pollutants are more a thing to be avoided than a thing to be taken out. So avoid collecting your snow near industrial areas or places known for their heavy traffic. These areas are far more likely to have snow containing heavy metals and other industrial chemical pollutants.
Beyond chemical industrial pollutants, there’s the very real issue of microorganisms in the snow. Generally, snow is free of such contaminants, but it can acquire them, usually through surface contact. This is why it’s important not just to melt the snow, but to boil it, removing all the pollutants.
Proper snow collection begins with location selection. Again, you want to avoid potentially contaminated areas. Then you want to scrape off the top layer of snow, which is the one most likely to contain these potentially deadly impurities.
Melting Your Snow For Survival

It goes without saying that melting snow requires some kind of a heat source. Even in a survival situation, where the grid has entirely collapsed (and civilization along with it), you’re going to have a few options for turning your snow into drinkable water.
- Portable Stoves: Camping stoves are a helpful, though not strictly speaking, necessary part of any bugout bag.
- Campfire: Campfires might be your best option, as they can be built just about anywhere with light and portable tools.
- Solar Melting: It’s not the quickest method, you might have trouble getting it to a boiling point and you’re going to need some sunshine. But you can, in a pinch, melt snow using the reflective power of the sun.

Don’t Die For A Drink: Purifying Your Melted Snow

Once the snow has been melted you’re going to need to, at the very least, filter it. Purification with tablets or through boiling is a better option, but filtration is absolutely better than nothing.
Hand-held water filters are cheap and readily available just about anywhere these days. What’s more, they’re highly effective at removing bacteria and protozoa from the water, which makes your chances of ingesting some debilitating or deadly parasite much better than simply drinking whatever you’ve managed to heat up to room temperature.
Water purification tablets and drops are likewise easy to come by and inexpensive these days.
Both of these are great, but at the risk of belaboring the point, nothing is going to do quite the job that boiling will.
If you find yourself in a winter survival scenario, be it getting lost in the woods on a ski trip or facing down the end of the world as we know it, knowing how to properly and safely melt and then purify snow for drinking water is one of the most valuable skills you can possess. What’s more, it’s not a difficult one to acquire at all, making the investment of time and energy versus the reward an absolute no-brainer.
Do you have any other secrets about staying hydrated in a winter survival scenario? Share your knowledge in the thoughts below.
Homesteading | Off Grid
Shelter from the Storm: Emergency Winter Shelters and Survival Tips

Winter’s unforgiving grip can turn a routine outdoor adventure into a life-threatening situation. What you thought was just a fun weekend skip trip or a hike in the woods has turned into a desperate battle against creeping death.
When the temperature plummets and the snow falls, you need the knowledge and tools to create an emergency winter shelter. You don’t need to be a prepper or a survivalist – this is paramount for your survival if you enjoy outdoor winter activities.

There are various types of winter shelters that can keep you warm and safe in cold weather emergencies. There’s no reason to be paranoid, but having these skills in your back pocket can make the difference between life and death if you ever find yourself in a winter emergency.
Why You Need To Learn How To Make Emergency Winter Shelters
When the temperature drops, your body’s core temperature can drop rapidly along with it. That means you’re at risk of hypothermia, frostbite or even death.
A winter shelter, even a crude emergency one like the kinds we’re about to describe below acts as your first line of defense against the chilling danger of the cold and damp. They provide you a warm and dry place to get your body temperature back up and rest while you wait for the cavalry to arrive.
Emergency Shelters For Winter Survival
There are some extremely easy to build but also extremely efficient winter survival shelters. Just about anyone can build these, even with their bare hands if they have to – but we recommend carrying around a shovel in your survival pack to help with construction.
Snow Caves

A snow cave is a winter shelter you can build anywhere there’s snow. Here’s how to build your own snow cave:
- Step 1: Find a compacted snowdrift or mound of snow.
- Step 2: Create an entrance by digging a tunnel into the snow..
- Step 3: Create a larger “room” inside. You want to have smooth, even walls. This reduces dripping water and condensation to keep you dry.
- Step 4: Dig out a small vent hole near the top. This allows air circulation while preventing carbon dioxide buildup.
Lean-Tos

A lean-to is another simple shelter you can build. It consists of a sloping roof leaning against a supporting structure such as a tree, rock, or wall.
- Step 1: Find a suitable supporting structure. It should be firm, sturdy and have good support from the ground.
- Step 2: Construct your roof using nearby branches, foliage, tarp, or even the snow.
- Step 3: Ensure proper ventilation while blocking one side to keep out the cold.
Quinzees

A quinzee is a snow hut made by piling up, the hollowing out, a mound of snow.
- Step 1: Pile up a mound of snow and pack it down.
- Step 2: Allow the snow to settle for a few hours.
- Step 3: Hollow out the mound, smoothing the walls for even insulation, just like you would on a snow cave.
- Step 4: Dig a ventilation hole at the top, allowing fresh air while preventing carbon dioxide buildup.
Survival Tips for Building Emergency Winter Shelters

There are some tips you should know about building emergency winter shelters for survival generally speaking.
Site Selection
Site election is arguably the most important part of building a winter shelter. Avoid areas with unstable snowpack as these are prone to avalanches and landslides. Flat, well-drained spots away from strong winds are going to be your best bet.
Snow Quality
Wet snow is unstable snow and thus not suitable for building shelters, so look for dry, compacted snow usually found in snowdrifts or mounds.
Ventilation
You must properly ventilate is vital for carbon monoxide prevention, which can be life-threatening… fast. Always dig out a vent hole near the top of your shelter.
Fire Safety
For the most part, you should not be building a fire inside your shelter. If you do, it’s important for you to be extremely cautious because of the fire, its impact on your shelter and the resulting carbon monoxide.
Warmth and Insulation

Insulating materials like pine branches, dry grass, or foam sleeping pads laid on the ground can create a barrier between you and the cold. This, in turn, will help you stay warm and retain body heat.
Surviving in the winter wilderness requires knowledge, determination preparation, and resourcefulness. Understanding the types of emergency winter shelters and how to build them is a valuable skill that can save your life in extreme conditions. While it’s essential to have the right tools and supplies, your survival ultimately depends on your ability to adapt and persevere.
Have you ever built an emergency winter shelter? Did you end up spending the night in it? What did you learn from the experience? Share your experiences in the comments below.
Emergency
Without Emergency Heat Sources You Will Die

Winter’s icy grip can be relentless and it doesn’t take the end of the world as we know it to make it unbearable – and dangerous. A power outage or other winter emergency can make having alternative heat sources not just a comfort, but a source of survival.
We’re going to explore a variety of options for alternative heating sources for when the heat in your home isn’t working for whatever reason. Some of these are tried and true methods, others are a little more experimental. All of them can make the difference between life and death in a winter emergency.
Emergency Heat Supply 1: Wood-Burning Stoves and Fireplaces

Wood-burning stoves are one of the most reliable and efficient sources of emergency heat. They can also be a cozy distraction from disaster, while also keeping your home warm whenever the cost of more traditional forms of heating get too high.
Not only can these stoves keep your house toasty warm, they can also be used for cooking. You need an adequate supply of dry firewood, as well as a smoke detector and carbon monoxide detector for safety. Keep the stove well-maintained – poorly maintained stoves are serious fire hazards
Traditional fireplaces can also be used as an emergency heat source. Fireplaces tend to be less efficient than wood-burning stoves, because heat escapes through the chimney. However, you can make your fireplace more efficient by investing in a hearth and sealing gaps or drafts in the fireplace and chimney.
Portable Propane Heaters

Portable propane heaters are an excellent choice for emergency heating. You need to make sure they are rated for indoor use. You also need to use them as directed and not use them while you sleep – that can be a serious fire hazard.
Much like with the direct fire sources talked about above, you need to make sure that you have working smoke detectors and carbon monoxide detectors for maximum safety. Proper ventilation is absolutely essential to prevent carbon monoxide build up, which can kill in a matter of minutes.
Kerosene Heaters

Kerosene heaters are another reliable source of emergency heat. Only use clear, 1-K grade kerosene. This is because it burns cleaner and produces less odor – you don’t want to make a bad situation worse by stinking up the place. As always, make sure your place is ventilated well and keep the heater away from anything that can start a fire.
Generators
Generators are not a direct source of heat, but they can power electric space heaters, or even keep your home’s electrical heating system going. This will help you to keep warm during power outages. Like everything else on our list, generators should be used with caution. Always place generators outdoors to avoid carbon monoxide buildup. If you’re not an electrician, we strongly recommend you have it professionally installed by one.
DIY Heating Solutions

For survivalists, there are a few ways for you to keep your home heated no matter how long the power goes out. Keep in mind that every heat source requires some kind of fuel. So you might need to get creative about how to stay warm if the power goes down, the supply chain is disrupted and there’s no chance of anything coming back soon. Here are a few innovative ideas:
- Terracotta Pot Heaters: Placing several terracotta pots within one another around a few lit candles will radiate heat. This will only warm a small space, but it’s better than nothing.
- Tealight Heaters: Multiple tealight candles placed under a terracotta pot creates a small heater that’s safe for indoor use.
- Heat-Reflective Panels: Heat-reflective emergency blankets attached to cardboard or foam panels will reflect and retain heat in a room.
Surviving winter emergencies and power outages requires careful planning and consideration of your emergency heat sources. Each of these options has its own set of advantages and disadvantages. But by understanding safe use of these heat sources (as having a well-prepared emergency kit) you can ensure you and your loved ones stay warm and comfortable during even the coldest winter emergencies.
Do you have any unique methods for generating heat without the grid? What do you and your family have for backup heat sources? Share your tips in the comments below.


Survival 101: Building Your First Emergency Kit

How to Pack a Bug Out Bag List That Could Save Your Life

Urban Survival Tactics for 2025: What Preppers Need to Know About Civil Unrest and AI Surveillance

The One-Day Prepper Pantry: Build a 30-Day Food Plan in One Afternoon
